A brick wall can bring a lot of character (and durability!) to your place, and building one yourself is easier than you might think. In this guide, we’ll take you through the whole process—complete with some handy masonry tips inspired by Colorado Springs. Whether it’s a small garden wall or a backyard project, we’ve got the steps to help you make it happen. So, grab your tools and let’s dive in—you’ll have a solid, eye-catching wall in no time! Plus, you’ll get the satisfaction of saying, “Yep, I built that!”
Materials and Tools Needed
Before beginning, make sure you have all the necessary materials and tools on hand.
Here’s a basic list:
- Bricks—Decide on the type of bricks you want for your wall, such as standard, reclaimed, or decorative bricks.
- Mortar Mix – A cement-based mix that binds the bricks together.
- Trowel – For applying and shaping mortar.
- Spirit Level – Ensures each layer is straight and even.
- Bricklaying Line – Helps keep rows aligned.
- Hammer and Chisel – Used for cutting bricks when necessary.
Step 1: Prepare the Site
Choosing the right location and preparing the site are key steps in the brick wall building process. Make sure the area is suitable for brick wall construction and free from any obstructions like rocks, roots, or debris that could disrupt the foundation.
- Mark the area – Clearly outline where the wall will be installed by placing stakes at each end and running a builder’s line between them. This line will help ensure your brick work is straight from the very beginning.
- Level the ground – To prevent your wall from leaning or sinking, create a flat, stable base. Use a shovel or rake to remove loose soil, rocks, and any uneven patches. This installation detail is essential for a long-lasting wall.
- Lay a foundation – Most brick walls need a solid foundation. Pour a concrete footing, typically about 6–12 inches deep, depending on the wall’s height and weight. The concrete provides a strong base to support the brick wall and prevent shifting over time, especially in areas with soft or unstable ground.
Step 2: Mix the Mortar
Mortar is the bonding agent that holds your bricks together, so it’s essential to get the mix just right.
- Prepare your mix – Mortar usually comes in bags with mixing instructions. Follow these closely, adding the right amount of water and mixing until it has a smooth, paste-like consistency. Aim for a thick texture, avoiding any lumps.
- Check the consistency – Test the mortar by picking up a small amount with your trowel. It should be sticky enough to hold bricks together but not so wet that it drips off the trowel. A balanced consistency will ensure strong bonding without being too heavy or too loose.
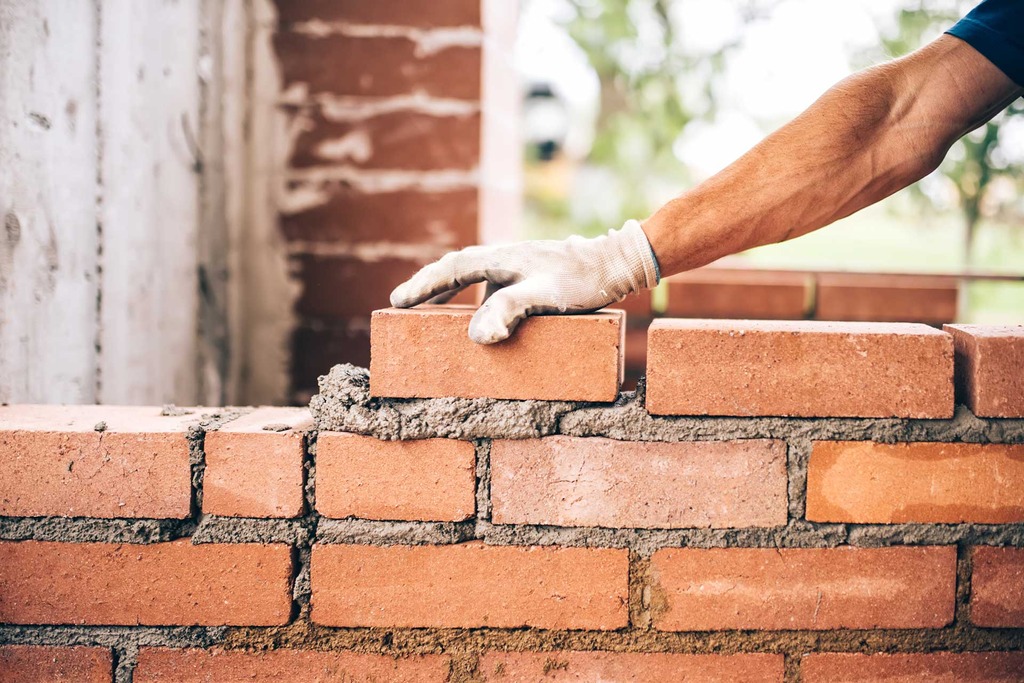
Step 3: Lay the First Course of Bricks
The first row, or course, of bricks is the base of your wall, so take extra care to make sure it’s straight and level.
- Spread a layer of mortar – Apply about an inch-thick layer of mortar on the foundation where you plan to place the first row of bricks.
- Lay the first brick – Place the first brick onto the mortar and press it gently but firmly. Use a spirit level to make sure it’s perfectly horizontal and aligned.
- Add more bricks – Apply a bit of mortar on the side of each new brick before positioning it next to the previous one. This side mortar helps bond each brick to the one next to it.
- Check alignment frequently – After placing every few bricks, check the row with a spirit level to make sure the line is straight. Using a bricklaying line along the row can help keep everything perfectly aligned.
Step 4: Build Upwards in Courses
Once the first row is complete, continue to add layers, or “courses,” of bricks.
- Stagger the bricks – For added stability, bricks should be staggered in each row. This means placing each new brick so that it covers half of the brick below it, creating a strong interlocking pattern.
- Add mortar between layers—Spread a layer of mortar on top of the previous row before pressing each new brick into place. This ensures that each layer bonds securely.
- Check each row – After laying each row, use the spirit level to verify that it’s even. This extra step may seem time-consuming but will prevent the wall from slanting.
Step 5: Cut Bricks as Needed
Sometimes, smaller brick pieces will need to be fitted to maintain the staggered pattern. Here’s how to make precise cuts.
- Score the brick – Mark where you need the brick to break, then use a chisel to score a line along that point. Make sure the line goes around all sides of the brick.
- Tap with the hammer – Place the chisel along the scored line and tap it gently but firmly with a hammer. Repeat this until the brick splits neatly along the line. This technique can take some practice, but it will give you clean, precise cuts.
Step 6: Fill Joints and Smooth the Surface
After building the wall, filling the joints between bricks and mortar gives it additional strength and a finished appearance.
- Use a pointing trowel – Press mortar firmly into any visible gaps between bricks, filling them.
- Smooth the joints – Run the edge of your trowel along each joint to create a smooth, even surface. This step not only improves the wall’s appearance but also helps prevent moisture from seeping in, which can weaken the structure over time.
Step 7: Finishing Touches
Your wall is now built, but a few finishing touches will enhance its durability and appearance.
- Brush off excess mortar – Use a dry brush to gently remove any extra mortar clinging to the surface of the bricks before it hardens. This will give the wall a cleaner look.
- Clean up the site – Sweep the area around your wall to clear away any remaining mortar or debris. A tidy site keeps your workspace safe and professional-looking.
Maintenance Tips for Your Brick Wall
A little routine maintenance goes a long way in preserving your brick wall.
- Check for cracks or chips – Inspect the wall regularly, especially after storms or temperature changes, to catch any cracks early. Filling these in promptly helps prevent further damage.
- Remove any moss or mold – Moss and mold can weaken the wall over time. Use a scrub brush or gentle cleaner to remove any growth as soon as you spot it.
- Seal the wall – Applying a weather-resistant brick sealant can protect the wall from moisture, prolonging its lifespan.
Common Bricklaying Mistakes to Avoid
Bricklaying requires precision and patience. Here are some pitfalls to avoid:
- Inconsistent mortar mix – Mortar that’s too thick or too thin won’t hold the bricks securely. Always check consistency before applying.
- Skipping the spirit level – Even a small slant in each row can add up, causing your wall to lean. Use a spirit level for each row to ensure perfect alignment.
- Not aligning bricks correctly – Misaligned bricks can weaken the wall structurally and aesthetically. Take your time to check each row’s alignment.
Conclusion
Building a brick wall is a hands-on project that can boost both your skills and the property’s appeal. By following these steps and avoiding common mistakes, you’ll be well on your way to creating a sturdy and attractive wall. With practice and care, you can master bricklaying and add a timeless, professional look to your surroundings.
For further guidance on maintenance, see brick repair colorado springs for expert insights.
