
Thinking about building a concrete block wall in Colorado Springs? It’s a solid choice for many projects, from garden borders to sturdy retaining walls. While it might seem straightforward, getting it right means understanding the materials and following a careful process. This guide breaks down how professional masons tackle a masonry block wall Colorado Springs project, step by step. We’ll cover everything from picking the right blocks to making sure your finished wall stands strong against our local weather.
Key Takeaways
- Concrete blocks offer strength and versatility for various wall types.
- Proper site prep and a level foundation are vital for wall stability.
- Using rebar adds significant strength to concrete block walls.
- Consistent mortar mix and careful laying are key to a durable wall.
- Regular maintenance helps extend the life of your masonry block wall Colorado Springs.
Why Choose Concrete Block Walls in Colorado Springs?
When you’re thinking about building a wall, especially here in Colorado Springs, concrete block construction offers a really solid choice. These walls, often called CMU walls, are super strong and last a long time. They’re great for all sorts of things, from building a sturdy concrete block foundation for your home to creating retaining walls that hold back soil.
Durability and Strength
Concrete blocks, or CMUs, are made from a mix of cement, aggregate, and water, which makes them incredibly dense and tough. This means they can handle a lot of weight and pressure, making them ideal for structural applications. Plus, they don’t rot or get eaten by bugs like wood can. This inherent strength is why they’re a go-to for many construction projects.
Versatility in Design
Don’t think concrete blocks are just plain gray squares. You can actually get them in different colors, textures, and even shapes. This allows for a lot of creativity in the final look of your wall. Whether you want something that looks like natural stone or a more modern, clean appearance, CMU wall installation can be adapted to fit your style.
Cost-Effectiveness
Compared to some other building materials, concrete blocks are often more budget-friendly. The material itself is reasonably priced, and the installation process, while requiring skill, can be more efficient than other methods. This makes them a smart choice for both large and small projects where budget is a consideration. For those looking into retaining walls, concrete blocks are a popular option for their reinforced protection.
Resistance to Elements
Colorado Springs can have some pretty wild weather, right? Concrete blocks hold up well against things like wind, rain, and even hail. They’re also fire-resistant, which is a big plus for safety. This kind of resilience means less worry about repairs down the road.
Common Uses for CMU Walls in Colorado Springs
- Foundations: A solid concrete block foundation is the base for many homes and buildings.
- Retaining Walls: They’re excellent for managing slopes and preventing soil erosion.
- Structural Walls: Used for everything from basement walls to exterior building walls.
- Decorative Walls: Can be used for garden walls or privacy fences with the right finish.
Choosing concrete block construction means you’re opting for a material that’s built to last, can be customized, and offers great value. It’s a smart move for many projects in our area.
Understanding the Materials: What You’ll Need
Alright, so you’re thinking about building a concrete block wall, huh? That’s a solid choice, especially around here in Colorado Springs with our weather. Before you start stacking, let’s talk about what you’ll actually need to get the job done right. It’s not just about grabbing a pile of blocks and some cement.
Concrete Blocks (CMUs)
These are the stars of the show, the concrete masonry units, or CMUs as the pros call them. They come in different sizes and strengths, so you’ll want to pick the right ones for your project. Think about the thickness you need – a standard 8-inch block is common for many walls, but you might need thicker ones for more structural support. They’re pretty heavy, so be prepared for that. Most importantly, make sure they’re rated for exterior use and can handle our Colorado climate.
Mortar Mix
This is what holds everything together. You can buy pre-mixed mortar, which is usually the easiest route for DIYers. Just follow the instructions on the bag for mixing – you want a consistency like peanut butter, not too wet and not too dry. Too wet and it won’t hold; too dry and it won’t stick. You’ll be mixing this up as you go, so plan on having a good mixing tub or wheelbarrow.
Reinforcement (Rebar)
For any wall that needs to be strong, especially in an area with freeze-thaw cycles like ours, rebar is a must. These are steel rods that go inside the block cores. They add a ton of strength and help prevent cracking. You’ll typically place them vertically and sometimes horizontally, depending on the design and local building codes. The rebar needs to be the right diameter for the block cores you’re using.
Tools of the Trade
Now, for the gear. You can’t build a wall with just your hands, unfortunately. Here’s a basic rundown of what you’ll likely need:
- Trowels: You’ll need a brick trowel for spreading mortar and a pointing trowel for filling in joints.
- Level: A good mason’s level is non-negotiable. You need to make sure every block is straight and plumb.
- String Line and Stakes: To keep your courses straight and true.
- Mason’s Hammer: For tapping blocks into place and sometimes for cutting.
- Chisels: For trimming blocks if needed.
- Measuring Tape: Obvious, but important.
- Wheelbarrow or Mixing Tub: For your mortar.
- Buckets: For water and carrying materials.
- Safety Gear: Gloves, safety glasses, and sturdy boots are a must. Seriously, don’t skip the safety gear.
Getting the right materials and tools ready beforehand makes the whole process go a lot smoother. It’s better to have a few extra things than to be stuck halfway through because you’re missing something important. Think of it as setting yourself up for success before you even lay the first block.
Step 1: Site Preparation and Layout
Before you even think about mixing mortar or laying the first block, getting the site ready and marking out your wall’s path is super important. This step sets the stage for everything that follows, and doing it right means your wall will be straight, stable, and look good.
Marking the Wall’s Footprint
First things first, you need to know exactly where your wall is going. You’ll use stakes and a string line for this. Pound stakes into the ground at the corners and along the line of your wall. Then, tie a string tightly between the stakes. This string acts as your guide, showing you the straight line your wall needs to follow. Make sure this line is taut and perfectly straight, as any curve here will show up in your finished wall. It’s a good idea to use plenty of stakes, especially if the ground isn’t perfectly flat or if there’s a chance of wind messing with the string. This initial layout is key for a professional finish.
Preparing the Ground Surface
Once you know where the wall goes, you’ve got to get the ground ready. This means clearing the area of any grass, weeds, rocks, or debris. You want a clean, solid surface to work on. If the ground is uneven, you’ll need to level it out. This might involve digging down in high spots or adding a bit of soil to low spots. A level base prevents the wall from leaning or sinking later on. Think of it like preparing a foundation for a house – it needs to be solid and flat.
Digging the Foundation Trench
Most concrete block walls need a proper foundation to keep them stable, especially here in Colorado Springs where the ground can freeze and thaw. You’ll dig a trench where your wall will sit. The size of this trench depends on the wall’s size and local building codes, but generally, it should be wider than the wall itself and deep enough to get below the frost line. A common depth might be around 8-12 inches, and it should be wider than the block. This trench will eventually be filled with concrete to create a solid footing. Properly digging and preparing this trench is a big part of building a strong wall.
Getting the site prep and layout right might seem like a lot of extra work upfront, but trust me, it saves a ton of headaches down the line. A crooked string line or an uneven base can lead to a wall that’s not just ugly, but also weak and prone to problems later on.
Step 2: Laying the Foundation and First Course
Marking the Layout
Before you even think about mixing mortar, you need to get the layout just right. This means marking out exactly where your wall is going to sit. You’ll use stakes and a builder’s line, kind of like a string guide, to keep everything straight. It’s really important to get this line perfectly straight because it’s your guide for the entire first course of blocks. If this first line is crooked, the whole wall will be crooked, and nobody wants that.
Preparing the Foundation
Next up is the foundation. In Colorado Springs, with our freeze-thaw cycles, a solid foundation is non-negotiable. You’ll typically dig a trench, maybe 8 to 12 inches deep, and fill it with compacted gravel. This gives you a level base and helps with drainage, which is super important to stop the wall from shifting later on. Some projects might call for a concrete footing, which is even better for stability, especially for taller or load-bearing walls. Making sure this base is perfectly level is key.
Laying the First Course
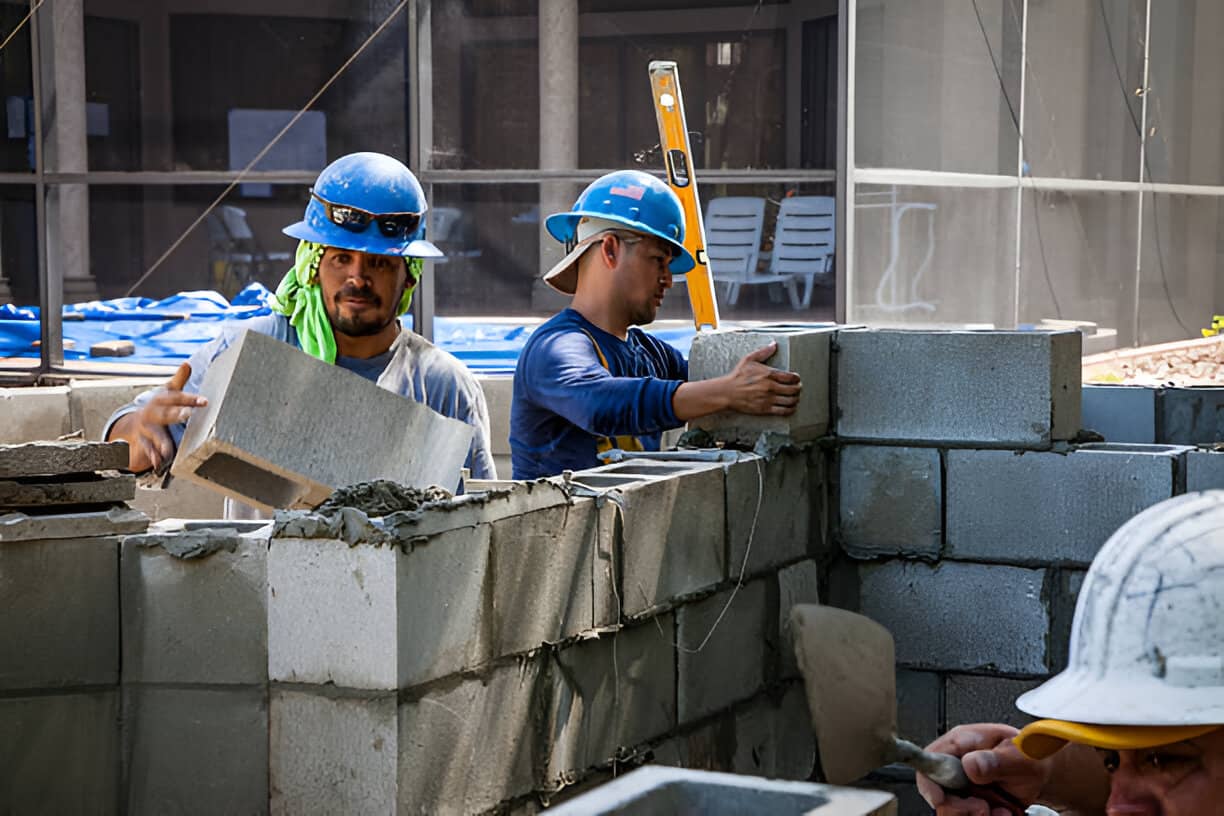
This is where the actual block laying begins. You’ll spread a layer of mortar, usually about an inch thick, onto the foundation where the first block will go. Then, you place the first block, pressing it down gently. The first course is the most critical; it sets the tone for the entire wall. Use your spirit level constantly to make sure each block is perfectly horizontal and plumb (straight up and down). You’ll apply mortar to the sides of the blocks as you place them next to each other, creating those strong bonds. Keep checking that line with your level after every few blocks. It might seem tedious, but getting this first row perfect makes everything else so much easier. For any block construction, getting the first layer right is a big deal, and you can find great resources on block construction to help visualize the process.
Mixing Mortar
While you’re getting the foundation ready, someone needs to be mixing the mortar. You’ll usually get it in bags, and you just follow the instructions on the bag, adding the right amount of water. You want a consistency that’s like thick peanut butter – sticky enough to hold the blocks but not so wet that it runs everywhere. If it’s too wet, it won’t bond well; too dry, and it’s hard to work with. A good mortar mix is vital for a strong wall.
Checking for Level and Plumb
Throughout this first course, you’ll be using your level a lot. You need to check that the blocks are level side-to-side, front-to-back, and also plumb, meaning perfectly vertical. Even a slight deviation here can cause problems down the line. It’s better to spend a little extra time getting this right now than to try and fix it later when the wall is already several courses high. You’ll also want to check that the blocks are aligned with your builder’s line. This initial alignment is what keeps the wall straight.
Key Considerations for the First Course:
- Level Foundation: Always start on a perfectly level base.
- Consistent Mortar: Use a consistent mortar mix for strong bonds.
- Frequent Checks: Use your spirit level after every block or two.
- Alignment: Keep the blocks aligned with your layout line.
Building the first course correctly is like laying a good foundation for anything in life – it makes the rest of the process much smoother and the final result much stronger. Don’t rush this part; take your time and get it right.
Step 3: Building Up the Walls and Incorporating Rebar

Now that your foundation is prepped and the first course of blocks is perfectly laid, it’s time to start building upwards. This is where the wall really starts to take shape, and attention to detail is key to making sure it’s strong and stable.
Building Course by Course
As you add each new layer, or course, of concrete blocks, you’ll be spreading mortar on top of the previous row. Aim for about an inch of mortar. Then, place the next block, pressing it down firmly but gently. It’s important to keep checking with your level after every few blocks to make sure each course is perfectly horizontal. Any slight tilt now will become a bigger problem later on.
- Staggering Joints: For maximum strength, you absolutely need to stagger the joints between blocks. This means that the vertical seams in one row should fall in the middle of the blocks in the row below it. This interlocking pattern is what gives the wall its integrity. You might need to cut blocks to achieve this pattern, especially at the ends of rows or around openings.
- Maintaining Alignment: Use a builder’s line stretched taut between the ends of the wall. This line acts as a guide, helping you keep each course perfectly straight and aligned with the courses below.
- Checking for Plumb: Beyond just being level horizontally, the wall also needs to be plumb, meaning it’s perfectly vertical. Regularly check the sides of the wall with your level to ensure it’s not leaning in or out.
Incorporating Reinforcement (Rebar)
For most block walls, especially those in Colorado Springs that might face freeze-thaw cycles or need to support significant weight, adding rebar is a must. This steel reinforcement is what truly makes the wall robust and resistant to cracking. The rebar is typically placed vertically within the block cores, which are then filled with grout or concrete. The placement and type of rebar will depend on local building codes and the specific engineering requirements for your project. It’s a good idea to consult with a structural engineer or a seasoned mason about the exact specifications for your wall. Proper integration of rebar is vital for the long-term durability of your structure, preventing issues like cracking and enhancing the wall’s load-bearing capabilities. Companies specializing in masonry often handle this critical step, ensuring everything is up to code and built to last.
The key to a strong block wall is not just stacking blocks, but creating a solid, monolithic structure through proper mortar application, staggered joints, and integrated reinforcement. Every step builds upon the last, so precision is paramount.
Step 4: Mortaring and Finishing Touches
Alright, so you’ve got your concrete blocks stacked up, and maybe you’ve even got some rebar in there for good measure. Now comes the part that really holds it all together: the mortar. This is where the wall goes from being just a pile of blocks to a solid structure. Getting the mortar right is pretty important, honestly.
Applying the Mortar
First off, you want to make sure your mortar mix is just right. It should be like thick peanut butter – not too runny, not too stiff. You’ll use your trowel to spread a layer of this mortar onto the top of the course you just finished. Then, you place the next block on top, giving it a little wiggle to settle into the mortar. Don’t forget to put mortar on the ends of the blocks too, so they bond to each other. It’s all about creating a strong connection between each block and each layer.
Checking for Level and Plumb
As you go, you’ve got to keep checking. Use your level to make sure each block is sitting straight, and the whole course is level. Also, check that the wall is going up straight, not leaning in or out. This is called checking for plumb. It might seem like a lot of checking, but trust me, it’s way easier to fix a mistake when you catch it early than trying to fix a crooked wall later on. A builder’s line can really help keep things straight as you build up the courses. If you need to find contractors for block wall construction, you can check out local masonry services.
Filling and Smoothing Joints
Once you’ve got your wall built to the desired height, it’s time to tidy up the mortar joints. You’ll use a tool called a jointer to smooth out the mortar between the blocks. This does two things: it makes the wall look neater, and it helps push the mortar in tight, which is good for keeping water out. You want a nice, consistent look across all the joints.
Cleaning Up the Excess Mortar
Before the mortar hardens completely, you’ll want to brush off any excess that got onto the face of the blocks. A stiff brush works well for this. It makes a big difference in the final appearance, giving you a clean finish. It’s like the final polish on a project. You really want to get rid of that excess before it becomes a permanent part of the wall.
Taking your time with the mortar and the finishing touches is what separates a good block wall from a great one. It’s the details that really matter in the end, making sure everything is solid and looks good too.
Maintaining Your Concrete Block Wall in Colorado Springs
So, you’ve got a solid concrete block wall, maybe for your home or perhaps a retaining wall holding back some of that Colorado soil. That’s great! The durability of masonry walls CO is pretty impressive, but like anything, a little attention keeps it looking good and performing well for years. Think of it as giving your wall a spa day, but way less complicated.
Regular Inspections
It’s a good idea to just walk around your wall every so often, maybe once or twice a year. Look for anything that seems off. Are there any cracks starting to show? Maybe some loose mortar? It’s usually the small things that can become bigger headaches if you ignore them. Catching a tiny crack early and patching it is way easier than dealing with a big problem later. This is especially true for building retaining walls Colorado Springs, where soil pressure is always a factor.
Cleaning and Mildew Prevention
Colorado Springs can get its share of weather, and sometimes that means moisture. If you notice any moss or mildew starting to grow on the blocks, especially in shaded areas, it’s best to clean it off. A stiff brush and some water usually do the trick. For tougher spots, a mild detergent can help. Keeping the surface clean helps prevent moisture from getting into the mortar joints. This is part of what makes the durability of concrete block walls so good – they don’t rot like wood, but keeping them clean is still smart.
Mortar Joint Care
Mortar is like the glue holding everything together. Over time, especially with freeze-thaw cycles common here, mortar can sometimes crumble a bit. If you see any joints that look worn or have holes, repointing them with a fresh mortar mix is a good idea. This isn’t something you need to do every year, but checking them during your regular inspections is wise. If you’re not comfortable doing this yourself, finding local masons for block walls is a solid option.
Drainage Checks
For retaining walls, proper drainage is super important. Make sure the weep holes or drainage systems behind the wall aren’t blocked. If water can’t escape, it builds up pressure against the wall, which is no good. This is a key consideration when building retaining walls Colorado Springs, and it’s worth checking periodically.
Taking care of your concrete block wall isn’t a huge chore. It’s mostly about being observant and addressing small issues before they grow. It’s a lot like maintaining your car; regular checks prevent major breakdowns. This proactive approach is key to enjoying the long-term benefits of your sturdy masonry.
If you’re ever unsure about what to look for or how to fix something, don’t hesitate to reach out to local masons for block walls. They have the experience to spot potential problems and the skills to fix them right, keeping your wall strong and looking great. For those considering new projects, remember that quality construction from experienced local masons for block walls is the best way to ensure longevity.
When to Call the Professionals for Your Colorado Springs Project
So, you’ve been reading up on building concrete block walls, and maybe you’re feeling pretty confident. That’s great! For smaller projects, like a garden border or a simple partition, a DIY approach can be really rewarding. You get that sense of accomplishment, and you save a bit of cash too. But let’s be real, not every project is a weekend warrior job. There comes a point where trying to do it yourself can actually cost you more in the long run, or worse, lead to a wall that just doesn’t hold up.
Complex Structural Requirements
If your wall needs to do more than just look pretty – like if it’s a retaining wall holding back a significant amount of soil, or if it’s part of a larger building structure – you really need to think about the engineering involved. Getting the foundation right, making sure the drainage is sorted, and using the correct reinforcement are all super important. A mistake here can lead to serious structural issues down the line. It’s not just about stacking blocks; it’s about creating a stable system. For these kinds of jobs, you’ll want to look into professional masonry services Colorado Springs has to offer.
Large-Scale or High-Wall Projects
Building a really tall wall, or a wall that spans a large area, is a whole different ballgame than a small garden feature. The sheer weight of the materials, the need for consistent mortar application across many courses, and the logistics of getting everything to the site can be overwhelming for a DIYer. Plus, working at height introduces safety concerns that are best managed by experienced crews. Think about projects like commercial building foundations or extensive boundary walls; these are definitely in the professional zone.
When Time is a Major Factor
Sometimes, you just need the job done quickly and done right. If you have a tight deadline for a project, whether it’s for a new home build or a commercial development, hiring professionals is the way to go. They have the teams, the equipment, and the know-how to complete the work efficiently without sacrificing quality. Trying to rush a DIY project often leads to mistakes, which then require fixing, costing you more time and money. For reliable concrete services in Colorado Springs, checking out companies like CCM+ LLC can be a good start.
Dealing with Difficult Site Conditions
Colorado Springs has some unique terrain, and your building site might not be perfectly flat or stable. If you’re dealing with slopes, poor soil conditions, or tricky access, these are all factors that professionals are equipped to handle. They can assess the site, plan for any necessary earthwork or stabilization, and build a wall that’s suited to the specific environment. Trying to tackle these challenges without the right experience can be a recipe for disaster.
When your Colorado Springs project gets tricky, it’s smart to know when to ask for help. If you’re unsure about handling a job yourself, or if it involves complex steps, it’s best to bring in the experts. Don’t risk making a small problem bigger. For reliable help with your masonry needs, visit our website today!
Wrapping Up Your Block Wall Project
So, you’ve seen how the pros put up strong concrete block walls, even here in Colorado Springs. It’s a lot of steps, from getting the ground ready to making sure every block is just right. While it might seem like a big job, taking it step-by-step makes it manageable. You end up with a wall that’s not just tough, but looks good too. Remember, getting the foundation solid and keeping things level are super important. If you’re thinking about a project like this, knowing the process helps a lot. It’s about building something that lasts.
Frequently Asked Questions
Why are concrete blocks a good option for building walls in Colorado Springs?
Concrete blocks, often called CMUs, are a great choice for walls because they’re super strong and last a long time. They can handle Colorado’s weather, like snow and sun, really well. Plus, they look good and can be used for all sorts of projects, from garden walls to bigger structures.
What are the main materials and tools needed for building a concrete block wall?
To build a strong concrete block wall, you’ll need concrete blocks themselves, a good mortar mix to stick them together, and rebar, which is like steel rods that make the wall even stronger. You’ll also need tools like a trowel for the mortar, a level to make sure things are straight, and maybe a hammer and chisel for cutting blocks.
What’s involved in preparing the site and laying out the wall?
First, you need to get the building spot ready. This means clearing away any rocks, plants, or junk. Then, you mark out exactly where the wall will go using stakes and a string line. It’s also important to make sure the ground is flat and firm, like a solid base, so the wall doesn’t sink or lean later on.
How do you start building the wall and add strength with rebar?
Laying the first layer of blocks, called the first course, is super important because it sets the foundation for the whole wall. You have to make sure this first row is perfectly straight and level. After that, you start stacking more blocks, adding mortar between them, and putting in rebar as you go up to make the wall extra sturdy.
What are the final steps in mortaring and finishing a concrete block wall?
After the blocks are in place, you fill the gaps with mortar, making sure it’s smooth and holds everything together tightly. You might also add decorative touches or seal the wall to protect it from weather. It’s all about making sure every block is well-connected and the wall looks neat.
How should I take care of my concrete block wall to make sure it lasts?
To keep your concrete block wall looking good and strong, you should check it now and then for any cracks or loose bits. Cleaning off any dirt or moss that grows on it is also a good idea. Sometimes, putting a special coating on the wall can help protect it from rain and ice, making it last even longer.
